I’m all self-hosted and stuff now!! Check out the full site at makingtruelove.com!!
❤
I’m all self-hosted and stuff now!! Check out the full site at makingtruelove.com!!
❤
PLEASE NOTE THIS WEBSITE IS NOW SELF HOSTED. CHECK OUT “WHY I STOPPED WEARING MAKE-UP” ON THE NEW SITE HERE!
When Gabriel and I first decided we were going in it for the long haul, I told him straight up, “If there’s anything I do, ever, that you don’t like, or don’t appreciate, or otherwise rubs you the wrong way, you tell me right away. I don’t want you holding on to little things here and there so five years down the road we’re all passive-aggressive at each other.”
He said he would do his best.
I thought I meant it.
However, a couple of weeks later, he came up to me and said “You remember when you told me to tell you if there was something you did that bothered me?”
“Uhoh” goes the internal monologue. “What did I do?!?! shit shit shit SHIT. I can’t think of anything I could’ve done. Panic panic Panic.”
My skin quivered at the thought of some mannerism of mine or another getting on his nerves, and just a couple weeks in.
“Yeah! What’s up?” I say mustering up as much courage and fake nonchalance as possible. Bracing my ego for the blow it was about to receive.
“I don’t like it when you wear make up” He says.
WTF?!!?! srsly? My face probably crooked under the pressure of confusion like an old gnarly tree that’s grown against strong gusts of wind.
“I think you’re prettier without it…”
The barriers I’d put up between him and my ego all melted immediately, like butter on a warm pan.
“And it stays on your face for like days after you put it on.”
Ok, it’s not fair to get me AFTER I’ve torn down the walls, mister.
No but seriously… can we go back to the part where you said I’m prettier without it, because I’ve been highlighting the outline of my eye in the thickest, most darkest shade of black since I’ve had access to an eyeliner pencil to hide the shit out of what my face actually looks like.
Why did I do that if I’m prettier without it?!
I stopped.
Didn’t need to ask me twice. Makeup’s expensive and makes no sense in the tropics. Plus, with the confidence I now had that the only man I cared about liked me better this way, there was really no reason
.
But it made me question why I had gone so many years thinking my face needed to be up behind a mask.
There was the darkness to it, the remnants of teen angst, the mystery, the you-can’t-look-at-my-eyes-without-first-having-to-locate-them-in-the-smog-of-confusion…
But mostly there was the I’m-not-pretty-enough.
Having not only the permission, but having actually been ordered NOT to wear makeup was liberating. a weight lifted off my shoulders.
It wasn’t so much the routine. I could put on eyeliner in a moving car, with one hand, at night, without poking out my eyeball, in about 20 seconds flat.
No, it was the removal of the veil.
From now on I wasn’t my mask anymore, I was going to be me.
That was nice.
—————————
Nice BUT, you gotta take care of you if that’s all anyone’s ever going to see.
Anna Akana does a real great video about this if you haven’t seen it already.
Is that the end of my makeup days forever?!!
Of course not. It’s nice to play dress up from time to time, to put on a costume because I feel like it, rather than because I don’t think the world will accept me without it.
I’m not that talented at makeup-artistry so it’s never too elaborate, but when we go out, I get done up.
I got my face done up for our wedding. 🙂
Ladies, you’re pretty enough. Take off your masks, take care of the lady underneath and let her shine. Feed her good food and lots of self love and allow yourself to find a man who loves the real you instead of the you that you wish you were. You’ll be amazed how much more amazing she is than you ever thought was possible.
PLEASE NOTE THIS WEBSITE IS NOW SELF HOSTED. CHECK OUT “LIFE WITH GABRIEL” ON THE NEW SITE HERE!
Jade: I feel bad about myself. 😦
Gabriel: Here… [hands me a bottle] …Drink some water.
Jade: …
#makingtruelove
(ok ok.. in his defense and to put it all in context, this happened just after eating waffles ‘à-la-mode’)
PLEASE NOTE THIS WEBSITE IS NOW SELF HOSTED. CHECK OUT “LIFE WITH GABRIEL” ON THE NEW SITE HERE!
Me: [Petting one of our 6 dogs] Who’s a good boy? Who’s a gooooooood boy.
Gabriel: Me! I’m a good boy!! I am! [wagging his non existent tail]
#makingtruelove
PLEASE NOTE THIS WEBSITE IS NOW SELF HOSTED. CHECK OUT “VOLARE” ON THE NEW SITE HERE!
For a couple of weeks, we thought we had accidentally planned our wedding on the night of a lunar eclipse.
Turns out the eclipse was the night before the wedding [you know, when they say 4am on April 15th, they mean the night of the 14th to 15th, not the night of the 15th to 16th!! silly us]
But I’d already started looking at what lunar eclipses were all about, and stumbled across a couple blog post which talked about the spirituality of eclipses and possible communing with ancestors, like this one by Gypsy Moon.
I don’t necessarily believe in this type of astrology, but I liked the idea of being able to commune with my late father, whom unfortunately would, obviously, not be attending my wedding, and whose void made me nostalgic.
So I decided (while still under the impression that the eclipse was on the wedding night) to light up sparklers at the sound of midnight, when the eclipse was supposed to start.
Well the night before the wedding, we figured out we were a day off!!
“But who cares!” I thought “I don’t need an eclipse, we’re lighting up the sparklers anyway!!”
So we did, but much before midnight!
Thanks to Kendal who caught it on tape, we managed to grab this very eerily special moment on camera!
Take a look for yourself:
Now, For those who are not familiar with the song, here are the lyrics of the original Domenico Modugno 1958 version (translated from Italian)
I think such a dream does not come back ever again.
I painted my face and hands blue,
Then I was suddenly taken by the wind,
And I started to fly into the infinite sky.Flying, oh, oh!
Singing, oh, oh, oh, oh!
In blue, painted in blue.
Happy to be up there.
And I flew, flew happily, higher than the sun, and higher still.
As the world slowly, gently, disappeared far out there,
A soft music was playing, just for me.But all dreams
Vanish at dawn because,
When the moon sets,
It brings them with it,
But I keep dreaming,
Of your beautiful eyes,
Which are blue like a sky,
Dotted with stars.Flying, oh, oh!
Singing, oh, oh, oh, oh!
In blue, painted in blue.
Happy to be up there.
And I flew, flew happily, higher than the sun, and higher still.
As the world slowly, gently, disappeared far out there,
Your blue eyes, you voice is the music,
That sounds sweet to me.Flying, oh, oh!
Singing, oh, oh, oh, oh!
In the blue of your blue eyes,
Happy to be down here,
In the blue of your blue eyes,
Happy to be down here,
With you ..
Alas, my eyes aren’t blue 🙂
PLEASE NOTE THIS WEBSITE IS NOW SELF HOSTED. CHECK OUT “LIFE WITH GABRIEL” ON THE NEW SITE HERE!
[during a silence while eating lunch]
Gabriel: Tell me more
Jade: No [motions to full mouth]
Gabriel: Tell me with your eyes.
Jade: [series of random eye expressions while chewing]
Gabriel: So, you were waiting for the guagua, but some guy cut you off and that was the last seat, but then another guagua came so you weren’t too mad…
#makingtruelove
PLEASE NOTE THIS WEBSITE IS NOW SELF HOSTED. CHECK OUT “HE LIKED IT SO HE PUT A RING ON IT” ON THE NEW SITE HERE!
We’re trying to do this wedding as cheap as possible, and the best way to do that was to sign all the paperwork at the “oficialia de estado civil” because it’s cheaper than having them come to you the day of the wedding.
I don’t really trust the dominican system, or our crappy lawyer, so we did it with time to spare, in case anything went wrong. We wanted to be officially married by our wedding date, so we went the 19th of March, almost a month to spare.
We rounded up our usual suspects:
 Madrina: Superstar Allison Sade
Padrino: Mr. Osterlund, Surfer Extraodinaire
Photographer: Tia Maru a.k.a. Hada Madrina
Here they are waiting out front for our turn, looking like the badasses that they are:

Let me give you a little insight into the Dominican Republic legal system…. they still use these things:
 No joke.
So here we are, in a tiny little sweaty room, packed with people, no aircon, fan blowing papers on the desk around and the judge makes everyone move aside and make some room, places 4 chairs in front of his desk for our 2 witnesses and ourselves, we said our “I dos”
Then he had us slip the rings on. Of course Gaby had to get all silly on me and put a ridiculous smile on my face.

And we kissed!!!

Well it turns out our photographer had snuck in some rice and showered us in organic confetti, which got everywhere, while all the people waiting for their turned watched. We all had a good laugh.
I duno though, seems to me Gaby thought he was makin’ a mistake 😉

Just kidding. We’re still laughing about Maru’s rice.
Ok, back to business, we got the signing done in the big official book.

And just like that, it’s official, we’re husband and wife!!

PLEASE NOTE THIS WEBSITE IS NOW SELF HOSTED. CHECK OUT “DIY WEDDING INVITES” ON THE NEW SITE HERE!
One of the major inconveniences of living on the North shore of the Dominican Republic is the complete lack of proper print shops.
While you probably have access to a staples or its equivalent, and you take for granted being able to print perfect double sided business cards overnight as a right, not a privilege, let me tell you, it is not so here. It’s hard for me to find access to a properly sharpened paper cutter here.
So when came time to send out wedding invitations, I chose to go DIY…. it wasn’t a choice really, it was a necessity…. On n’est jamais mieux servi que par soi-même.
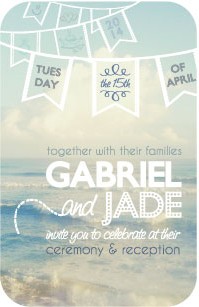
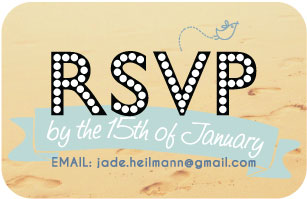
I wanted an envelope with a surf-inspired liner, an invitation card, and RSVP card, and a more in-depth letter.
Here is how I went about making my surf-inspired wedding invitations.
I found some plain white greeting card envelopes and downloaded an envelope liner template.
I needed 30 invites. Two liners fit on an 8 1/2 x 11, so I printed my surf pattern on 15 sheets of paper.
*Remember when you print your pattern that you should print it landscape, not portrait, because the liners fit side by side with the top and bottom on the 11″ length, and sides on the 8 1/2″ width.
I then traced the template on the backside (white side) of the pattern papers. If you lived in a regular country you could just print the pattern papers with the pattern on one side, and the template in a light grey on the back all in one go.
I then carefully cut along the line of the liner template, and voila! I now had 15 envelope liners ready to be inserted!

The inserting and glueing of the liners is actually the tricky part, and I know this is long, but bear with me here…
*Too much glue will make your envelope paper warp*
The trick to keeping your envelope paper neat and crisp is to apply a light layer of paper glue, WITH A BRUSH, along the edges of the liner only.
The most effective way to do this is to place your liner, pattern side down, on a sheet of newsprint (the cheap craft paper type stuff, not actual newspaper!)
*Newspaper ink will bleed onto your paper, keep newspaper away from your work!!*
Squeeze a light line of glue on one edge of your liner, then spread it gently with a brush. You want it to be barely wet, but evenly distributed with no holes. If you’re never done this, practice with a few blank sheets of paper first so as not to waste money.
Then turn your liner to the next edge, being careful not to get it in the glue that is now on your craft paper, place it just below that line of glue so as not to waste too much craft paper, and repeat the line/spread action, all the way around the 4 edges of the envelope, keeping the bottom edge glue-less.
*Keeping the bottom edge of your liners dry will make it easier to insert the liner into the envelope.*
Once you have gone all the way around your liner, grab your envelope with your left hand from just above the bottom corners and push gently to open the envelope mouth wide. With your right hand grab your liner by pinching it toward the peak, just below your glue line, and insert the bottom right corner in until it touches the bottom right corner of the envelope, being careful not to touch the wet glue onto the envelope yet.
Once that corner is aligned, align the bottom left corner. Now place everything on a flat, dry, and clean surface on your desk, take a plastic ruler, and press from the bottom to the top of the envelope as if you were squeezing a tube of toothpaste dry. Do this slowly and keep your aim of aligning the peak properly the whole time, making small adjustments as needed.
*Because you put only a very thin and even layer of glue on your liner, you shouldn’t get any ugly blobs of glue squeeze out. If you do, you’re putting too much glue on.*
Place another clean sheet of paper on top of your envelope and gently use the side of your hand to put pressure on all the areas with glue.
Gently push the side of your envelope together again to open the mouth again and slip something, like a small bead, inside the envelope to keep the top from glueing to the bottom. Your envelope is useless if it’s glued shut. Place it somewhere clean and with good air circulation and allow it to dry.
Continue to the rest of the envelopes until they’re all lined.
They should look something like this:

In the real world, this would be really easy:
I have access to neither paper cutters, nor corner punches, so I did it the old-fashioned way…. with a ruler and X-acto knife.

Actually, it’s even more complicated than that. I couldn’t get anyone to print on card-stock, so I had to print them on regular paper, glue them on card-stock, and then slice them, but I won’t bore you with all that.
What’s really important for you to remember here is to leave a little bit of bleed around your cards, and to give yourself crop marks, in order to make the slicing easier.
Also, and especially if you’re using a corner punch, make sure you cut perfect right angles.
This part took me a really long time, but you should come out of the print shop pretty much ready to go.
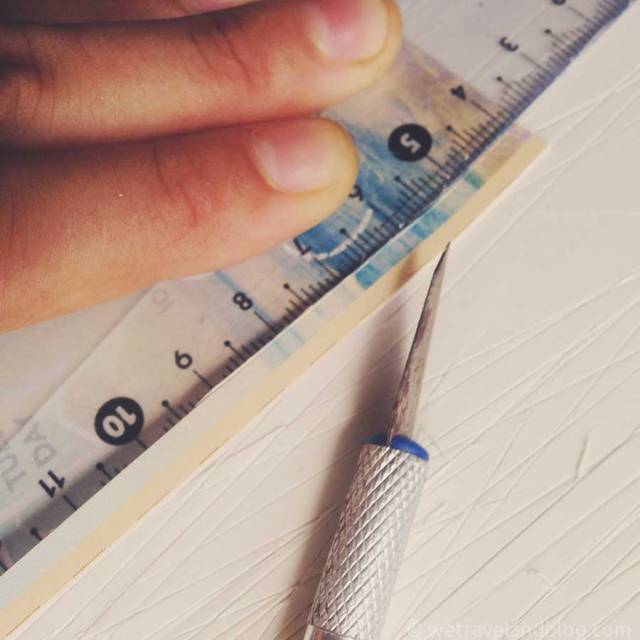
If for some reason you also need to use an X-acto kinfe, keep excess sheets of card-stock under your work, and give slow but confident and deep cuts along your ruler, keeping your ruler fingers down tight on either end of the line you need to cut so it doesn’t budge.
One sheet of 8 1/2 x 11 can be used to print two side-by-side letters which will fit nicely in a greeting card envelope once folded in thirds.

When you design your inserts, try to add nice embellishments, such as drop caps, that match the invitation cards you created.

Also, remember you’re inviting loved ones, so make it warm and personal, for example by adding nice signatures at the bottom. We hand wrote the “Dear [guest]” at the top of each letter and then both signed nicely at the bottom as well.

It’s come to my attention that a lot of people don’t actually know how to properly fold a letter in thirds, so here’s a crash course:
(except do it right, unlike in the video, so it’s EXACTLY in thirds)
 Voila! There you have it. All components of my wedding invites:
 We sealed the envelopes with a fingerprint heart, which I forgot to take a picture of, but looked sort of like this idea.
I addressed them, then mailed them, but back to being in the Dominican Republic, where the mailing system is close to non-existent, turns out only about half of them made it to their destinations. 😦
Good thing they were just for show I guess!!
Have you made wedding invitations? do you plan to? did these instructions help or inspire you?
If you’re confused about anything let me know so I can clarify!
Thanks for tuning in. 🙂
PLEASE NOTE THIS WEBSITE IS NOW SELF HOSTED. CHECK OUT “PEEKABOO, I SEE BLUE” ON THE NEW SITE HERE!

So you found the perfect shoes, but they’re missing that little je-ne-sais-quoi. How about sprucing them up yourself, Louboutin-style?!?
That’s just what I did for my wedding pumps: sprayed the bottom with a tiffany-blue spray paint to add a flirty touch to my dancing step!
Let me walk you through the process so you can do it yourself!

you’ll need:

first, carefully tape around the edges. You’ll want to do this part VERY CAREFULLY, this is the most important and difficult part. If you spend the extra time to do this right, you’ll save yourself a lot of headache, panic, and clean up later.

Go all the way around the bottom of the shoe, masking the edge of the area to be painted.

Once you’ve gone all the way around, paying special attention to all the curves, wrap the entire shoe with paper.
Use your free hand to roughly rip the correct shape, while taping it down over the first layer of tape with the other hand.

Make sure to not leave any holes or creases that the paint could spray of leak through.
Once you have both shoes gift-wrapped and hermetically sealed, you’ll want to wash the area with rubbing alcohol or vinegar, whatever you have on hand. Nail polish remover works too.

My shoes had been used once before, so they were a little bit dirtier than is recommended, but it’s alright.
Now you’re ready to start shaking that spray paint can, and read the instructions!
Usually you’ll want to keep the can about a foot and a half from the shoe.

Try your best to keep the layer light and even.
If your layer is too thick it will take forever to dry, and if it’s not even, it will be harder for the paint to dry in an even and shiny layer. You’ll get bumps.
You should only need one coat, but if you need two, let the first layer dry fully, according to the directions on the paint.

You’ll notice my paint bubbled up a bit around the parts that were still dirty. This is why you want to wash your shoe well. I didn’t mind too much, that’s the part that gets walked on anyway, but if this happens to you in a noticeable part of the shoe, get paint thinner, take the paint off, wash your shoe again, and try again. This is obnoxious and messy, so make sure to clean your shoe thoroughly.
If you’re not used to spray paint, try spraying an even layer on a piece of paper first to get the hang of it.
If you know you hate spray paint, try with a craft paint instead. personally though I find spray paint evens out best and leaves no brush marks. It’s sharp.
You could also do this with a nail polish, but it’s more expensive, and you’ll want to apply it with a bigger brush than the one provided.

Once your shoes have dried enough to be touched without leaving marks, very carefully take first the paper off, then the inside layer of tape.
Not waiting until they’re fully dry helps the tape come off clean, but be careful not to let the tape touch the shoes.
If you did a crappier job taping than you’d hoped for (as I did) keep calm and take out your nail polish remover and cotton pads. Carefully wipe off the paint, folding the pad, or changing it, after every wipe so as not to spread the paint even more.
If you want extra bling, once the color has dried fully, you can give it a layer of glitter, either with a spray glitter paint, repeating the above steps, or with a glue and glitter, the way it is applied in this tutorial.
For extra longevity, consider a layer of clear lacquer.
Voila!
You can also do this for your special going-out shoes, or for any special occasion, and in any color!! Go wild and thank Louboutin!
Let me know how it goes!

Pauline Gretsky’s Giant Rock.
Gabriel and I aren’t the biggest traditionalists, as you might have figured out while reading the post about my wedding dress.
So when it came to our official engagement, things didn’t go quite like they do on a “regular” basis.
…only in that I didn’t know exactly WHICH night it would come.We’d had the conversation many times as to when we would get married, and when we’d have children. Not that we’d planned the dates of both, but really, how can you be in a relationship and not know where your future with this person stands?
It was obvious from early on that Gabriel and I would marry, it was a no-brainer; there is no one else for either of us, but we also function on a very limited income and although we both think the best things in life are free, we also both know food isn’t, and neither’s gas.
So we had discussed the wedding a few times. Do we even have one? Weddings are expensive and we could use that cash on a new lens, or a year’s worth of camping supplies. And yet, when you’re really in love, this thing inside you wants to scream it from the rooftops for everyone to hear, and so in the end, we decided to go for a small and intimate wedding.
But before the wedding comes the engagement, and for that surprise, I just had to wait.
One morning Gabriel casually asked me if I had a ring that fit my finger.
“Damn you really put the ‘b’ in subtle don’t you?” was my immediate answer, if I remember correctly. To which he replied, “hey, you don’t know when!”
Touché.
To be honest, I had no idea what to expect. We had talked about the ring though, and I’d been pretty clear:
and move on to the next lad.
Now this might confuse a few of you ladies (and the guys too)
It’s real simple though, and this funny little video will do a better job of explaining it than I will:
See, any man who doesn’t consider the societal influence and global impact of his actions is no man of mine, neither is one who’ll blindly follow tradition for tradition’s sake.
We had actually spoken about getting wooden rings, though as surfers, decided it was probably a pretty bad idea. But I highly recommend them to those of you who’s hands aren’t constantly in salt water.
It can be argued a ring is just a symbol of ownership, but we don’t belong to each other, although we belong together. This concept might be hard to understand for one who’s never really been in love but it goes a little like this:
WE (him and I together, the unit that is US) are OURS (to him and I together, to the unit that is US)
We cannot belong to EACH OTHER because each of us is and individual. If the unit breaks, the whole thing’s off, there’s nothing left to belong to.
BUT Beyoncé did say “if you liked it then you shoulda put a ring on it” and we should all listen to Beyoncé.
No but really, while it’s important to understand that a woman cannot belong to you, or vice versa, it’s equally as important in my mind to publicly display your commitment to each other.
Sure, sometimes people will find it to be an even more interesting challenge to try to pick you up if you’re married, but as a rule of thumb, when I meet new people, I like to let them know ASAP that I’m in a committed relationship.
How many times has the dynamic completely changed when I finally found the not-so-awkward moment to tell someone I have a boyfriend, whom I love.
Having a ring on your finger lets the stress off, and I flash my Plain-Jane wedding band as much as I can, whenever I can. If you still try to hit on me after that, your beef, not mine. (And also, I know exactly the kind of dude you are, the disrespectful kind, which makes me much less likely to take anything you say seriously, if I continue talking to you at all)
“What do you mean you flash your wedding band? You’re not married yet!”
About that.
So one fateful day Gabriel told me not to worry about dinner, he was on it. This happens often. He cooks just as much if not more than I do at this point, mostly because he’s better than I am at time management.
It had been a hectic few weeks and we hadn’t had much time to ourselves. We had actually just finished climbing Pico Duarte and were still blown from how tough a hike that was. So when he said to me that we’d be eating dinner upstairs tonight, I thought he was planning a romantic evening so we could get back to Gaby-Jade bonding time. The bells didn’t go off.
He waltzed me upstairs where he had lined a walkway in candles, on the flat roof, leading to an adorable coffee table, set up on a towel area rug, and adorned with two little pillows for seats, two candle-lit pasta plates looking succulent in the warm glow.
“Damn he’s gone all out for this one” I thought and quickly took a pic to instagram how in love I am with this cutie pie. Unbeknownst to me, I was about to get engaged.
“Save room for desert” he tells me with a wink.
Well desert came and went with a flash and when it was over he said, “turn around, there’s something behind you, but don’t turn back around until you’ve opened it”
Well I’d lie if I said that’s not when the bells started going off, and before I even turned around I stared at him with that blushed “oh-you-shouldn’t-have” face.
Well I still had no idea what to expect and so I shook the little basket and it jingled like a cat bell.
Confused.
So I opened the little basket and inside were two simple wedding bands, engraved with the initials L.P.H.
I said yes… In case you were still wondering.
Then he told me L.P.H. was for Love Peace Happiness and I said yes a million more times.
“Do we put them on now?” I said.
“Are we married?” he replied?
And so we slipped them on each other’s fingers.
So yes, I’m already wearing my wedding band, and so is he.
We’ll be officially married sometime this month, when all the paper work goes through and the big party is the 15th of April, but we’ve been “married” since we were officially together June 2nd 2012, when I handed him my pack of smokes in exchange for his undying commitment.
His commitment is.
Has a diamond ever kept anyone from divorcing? no.
Has a diamond ever done anything other than fill the pockets of moguls who rape the african landscape and the people who inhabit it? Yeah, the ones on my drill bit chew through sea-glass pretty effectively.
Ladies, when he asks you to marry him, you should answer based on the size of his heart, not the size of the rock. If you’re worried about your financial security, get a job. The only thing that matters is how he holds you in his arms, everything else is what society is pushing upon your relationship. Love conquers all. As long as you are there for each other, your future is set.
Gents, you don’t need to waste your cash on a useless symbol. Spend more time working on the real thing. If she insists, she’s not the one for you, she will forever judge you based on what her friends are whispering when you’re not around, instead of melting over what you whisper in her ear.


